
This is a staple vegetable in our house during the colder winter months to serve as a simple side dish, toss into salads, or add to cozy soups. Oftentimes, learning how to roast butternut squash can be time-consuming and a pain. But after lots of trial and error, I’ve created a method that makes it easy to cut the squash and omits the peeling step for the quickest, cleanest prep.
My family loves anything with butternut squash. What I love is that it’s easy to customize with different spices to give it a flavorful twist every time I roast it. This is truly a recipe with minimal prep time (5 minutes!) since the oven does all of the cooking for you. My kids love it stirred into minestrone soup or pureed into coconut butternut squash soup.
Why you’ll love this recipe
- Minimal chopping and no peeling of the squash – It’s really that simple. Peeling a whole squash can be a bit annoying, but with my method there’s no need to peel.
- Versatile to use in many dishes – Roasted squash can be used in a variety of dishes like soups, stews, and salads. Or, you can serve it on its own as a side dish with your favorite main course.
- Tasty even for picky eaters – Once roasted, the vegetable (that’s really a fruit!) takes on a sweet, slightly nutty, caramelized taste that all ages will love.
Tips for Busy Cooks
If you want to prep the butternut squash in advance, that’s easy to do! You can either cut it and store it in the fridge for easy roasting later, or roast it for quick reheating and keep in the fridge for up to 5 days.

Picking the perfect butternut squash:
The flavor of your butternut squash can vary widely, based on the ripeness of your squash. Luckily, there are a few signs to look for when shopping at your local farmer’s market or grocery store. Important factors for finding the best, ripest butternut squash include:
- Color – The best squash will have a light, creamy-looking tan color with a matte finish.
- Texture – Butternut squash should be firm to the touch without deep bruises, scratches, or cuts.
- Mold– Make sure the stem is free from mold or discoloration.
- Weight – Don’t be afraid to get hands-on, and lift up several different squash. You want to look for one that feels heavy for its size in order to know it’s ripe!
How to roast butternut squash (2 ways)
Wondering how to roast a butternut squash without the risk of losing a finger? My tried and true method works every time, and has you in and out of the kitchen fast!
I’ll show you how to roast butternut squash halves and cubes so you can use them in any recipe.
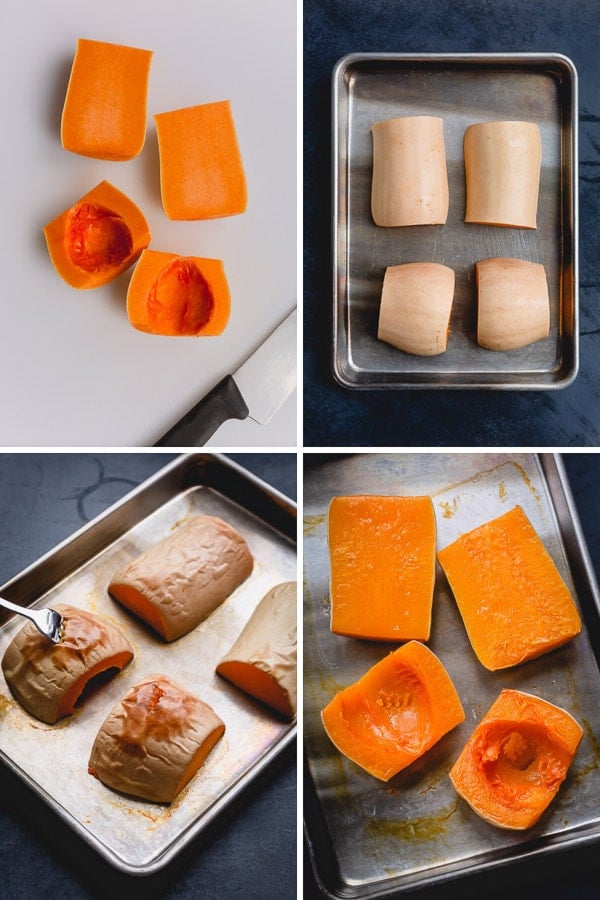
Method 1: Roasting in Halves
- Preheat the oven to 400°F.
- Use a sharp knife and cut off the ends of the squash. Then, cut the squash horizontally above the bulb, and slice each piece in half vertically.
- Scoop out the seeds from the bottom portion.
- Arrange the squash halves on a baking sheet, flesh side down.
- Add 1/2 cup of water to the pan, and roast until fork tender, about 40 minutes.
- Allow the squash to cool enough to handle. Then, scoop out the flesh, and discard the skin.
Method 2: Roasting in Cubes
- Preheat the oven to 400°F.
- Use a sharp knife to cut the ends of the squash off. Next, cut the squash horizontally above the bulb and slice each piece in half vertically.
- Scoop out the seeds and peel.
- Cut each half of the squash into strips. Then, cut the squash strips into cubes.
- Arrange the cubes in an even layer on a baking sheet.
- Add ½ cup of water to the pan, and roast until fork tender, about 40 minutes.
Expert Tips:
- Wash thoroughly. Give the squash a quick rinse, and remove any produce labels before you begin.
- Use a rimmed baking sheet so you can add the water which will help steam and cook the squash as it roasts.
- Adding water to the baking sheet helps the squash to steam perfectly. After testing many methods of roasting the squash, adding a little bit of water to the baking sheet steams the squash to be perfectly tender but also evaporates in time to allow the outside to caramelize until it’s golden brown in color.
- Line your baking sheet. Lay a piece of parchment paper on your baking or cookie sheet so the squash lifts off easily and doesn’t stick to the pan.
- Make sure to use a sharp to get the job done safely. A good quality sharp chef’s knife doesn’t have to be expensive! I’ve been using this inexpensive chef’s knife for many years now and still love it.
- Cut the squash in half horizontally right above the bulb rather than vertically. This way you’ll have 2 pretty stable pieces of squash to deal with and it’s so much easier.
- Cut the cubes into equal-sized pieces to ensure they all cook evenly and at the same time.
- Don’t peel the skin before roasting. It’s so much easier to scoop out the soft flesh once it’s done cooking!
Ways to use roasted butternut squash
While it’s delicious on its own, butternut squash is also surprisingly versatile! Some of my favorite ways to use it include:
- Coconut Butternut Squash Soup
- Instant Pot Butternut Squash Soup
- Added to stews and stir-fries for more flavor and texture.
- Substitute for pumpkin in muffins and breads.
- Pureed to serve alongside a protein, similar to mashed potatoes.
- In smoothies for extra thickness and a sweet taste. Picky eaters won’t notice the squash!
- Topped with brown sugar and cinnamon for a sweet side dish.
- Scattered over salads for extra texture and a hint of sweetness.

Storage
Store any leftover roasted butternut squash in an airtight container in the fridge for up to 5 days. Reheat in the oven or microwave for a few minutes until warmed through. You can also store cut but not roasted squash in the fridge for up to 5 days as well. This makes for no prep time if you want to roast it as an easy side dish with dinner.
Freezing roasted butternut squash is an option as well for up to 3 months. Once the squash thaws and is reheated, we can’t promise it will be as rich in consistency as cooking it fresh.
FAQs
Roasted squash will last for up to 5 days in an airtight container in the refrigerator.
Yes, you can freeze leftovers for up to 3 months! Thaw in the fridge overnight when you’re ready to use. Then, reheat mashed squash in the microwave or stovetop, and warm cubed squash in the oven to help it crisp back up.
You sure can! For a sweet option, try sprinkling your squash with brown sugar, maple syrup, or cinnamon. Or, for a more savory taste, try seasoning your roasted squash with herbs, spices, and aromatics like minced garlic, rosemary, thyme, cumin, or cayenne.
It will take about 40 minutes to roast a butternut squash that is cut into halves or cubed. It could take longer if your squash is larger in size.
More delicious side dish recipes

How to Roast a Butternut Squash
Ingredients
- 1 butternut squash washed
Instructions
- Preheat the oven to 400°F.
- Using a sharp knife, cut both ends off. (This inexpensive chef’s knife is great!)
- Then cut the squash horizontally above the bulb portion.
- Now cut each pieces in half vertically.
- Scoop out the seeds from the bottom portion.
- Arrange the squash halves on a baking sheet, flesh side down.
- Add ½ cup of water into the pan. Roast for about 40 minutes, or until fork tender.
- Cool slightly and scoop out the flesh with a big spoon. Discard the skin.
Share your thoughts! If you make this please leave a review letting me know how it was!
Notes
– Freeze roasted butternut squash for up to 3 months.
– Thaw the squash in the fridge overnight. Reheat mashed squash in the microwave or stovetop, and warm cubed squash in the oven to help it crisp back up. Note 1: Feel free to add more flavor to your squash with toppings like brown sugar, maple syrup, cinnamon, garlic, rosemary, thyme, cumin, cayenne, etc.
Nutrition
* Disclaimer: All nutrition information are estimates only. Read full nutrition disclosure.

Tried this recipe?
Make sure to leave a recipe review below!
Sharing of this recipe is encouraged and appreciated. Copying of full recipe to any social media is prohibited.
Stay connected and join Busy Cooks community:
FACEBOOK | PINTEREST | INSTAGRAM

Comments + Reviews