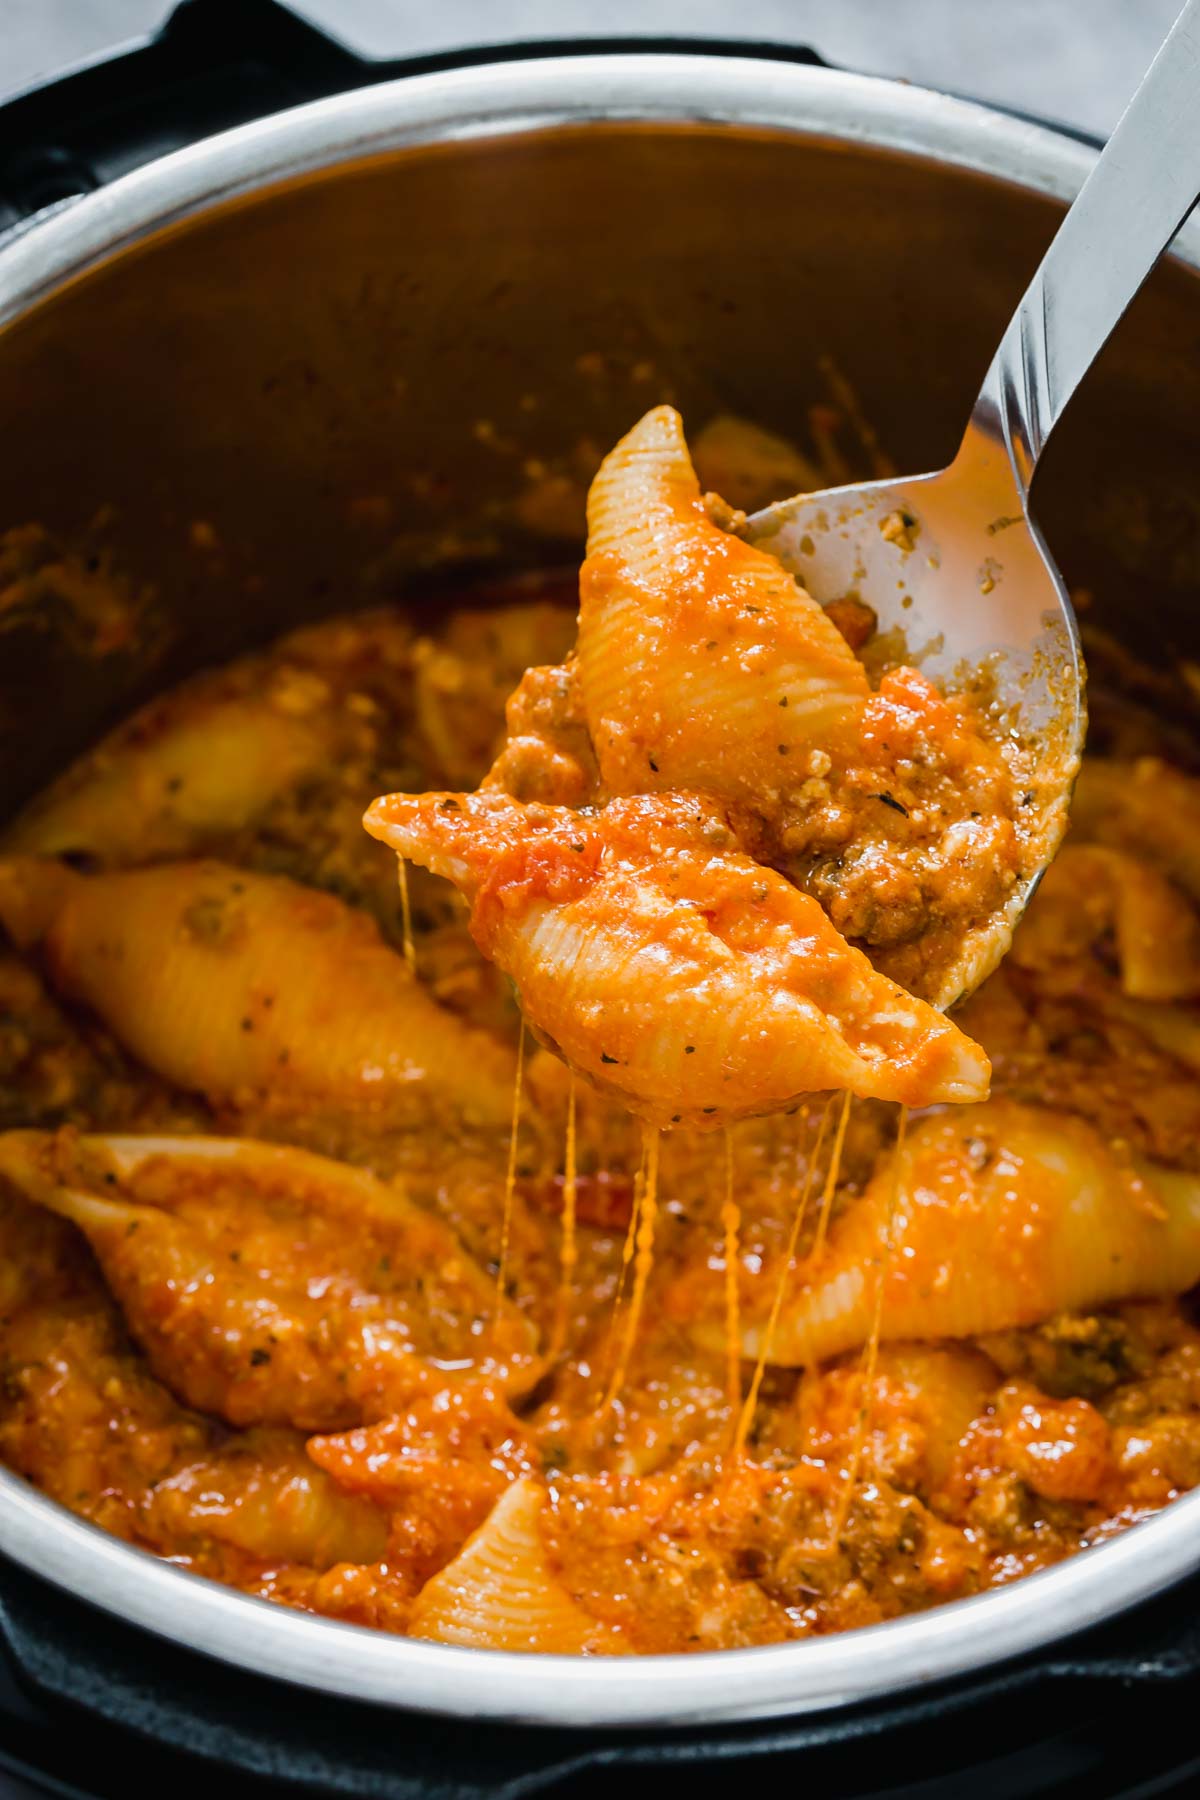
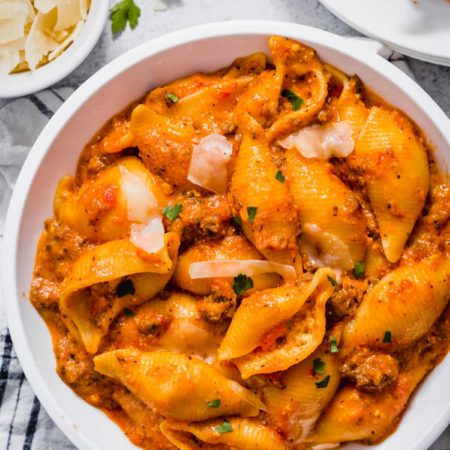
You’ll love this Jumbo Stuffed Shells with Meat Sauce Recipe
This stuffed shells with meat sauce recipe is a great comfort meal. With ooey gooey cheese in a tasty meat sauce.
- No need to pre-cook the pasta means no dirtying extra pots.
- And instead of spooning the filling into the shells, put the filling into a piping bag (or a ziplock bag) and pipe into the shells. It’s so much faster that way.
Stuffed shells have never been SO EASY!!!
Stuffed Shells Instant Pot Ingredients
- Pasta – You’ll need conchiglioni pasta or jumbo pasta shells. These have enough space for the filling.
- Pasta sauce – A good quality pasta sauce. I love Rao’s Homemade Tomato Basil Sauce.
- Cheese – This recipe has 3 types of cheeses: mozzarella, ricotta cheese and parmesan cheese which gives it such a great taste.
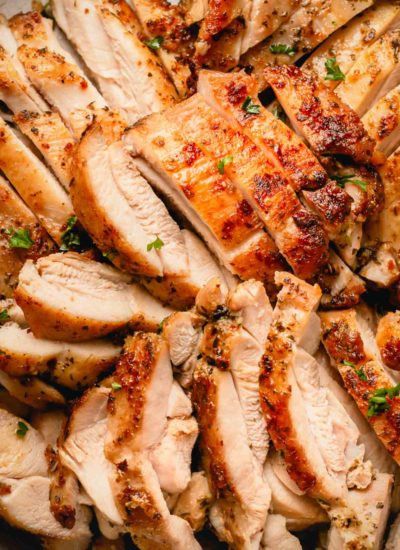
- Ground beef – I like to use lean ground beef. But you can choose whichever ground beef type you prefer. The difference between the different types of ground beef is the fat content and where the meat comes from.
- 70/30 ground beef means 70% lean meat and 30% fat. Typically, this ground beef is made of brisket or shank. It’s ideal for juicy burgers and meatballs!
- 80/20 ground beef consists of 80% lean meat and 20% fat. It’s best for leaner burgers, meatloaves, and chili!
- 85/15 ground beef is made of 85% lean meat and 15% fat, which is considered as lean ground beef. It’s perfect for lasagna and spaghetti.
- 90/10 ground beef is extra lean ground beef made of 90% lean meat and 10% fat. It’s perfect for stuffed peppers, cabbage rolls and tacos.
Substitutions for Instant Pot Stuffed Shells
- Ground beef – You may substitute Italian sausage for ground beef. Instant flavor boost!
- Ricotta cheese – Cottage cheese can be used in place of ricotta cheese.
How to make Stuffed Pasta Shells with Meat
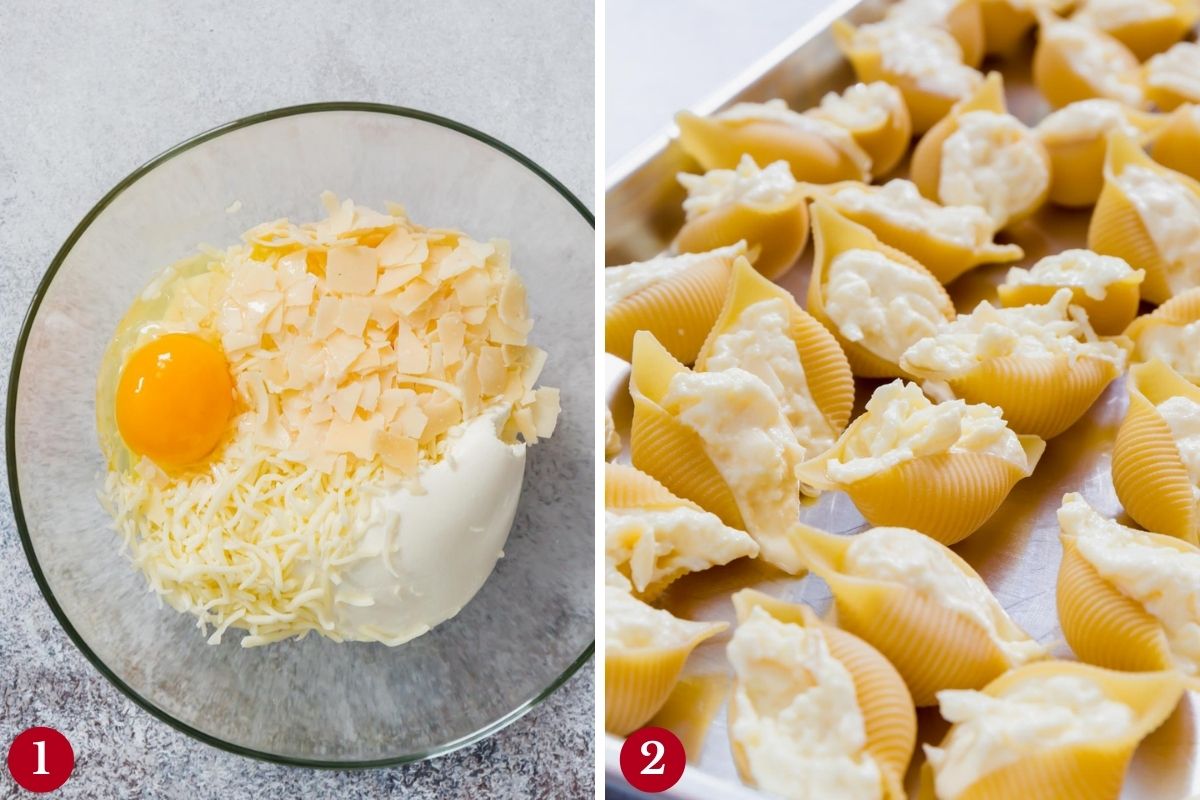
1. Make mixture and fill pasta shells:
- Combine the ricotta cheese, egg, parmesan cheese and 3 cups of mozzarella cheese.
- Place the mixture into a piping bag with a round tip (or a zip lock bag with one corner cut). Fill the pasta shells with the mixture.
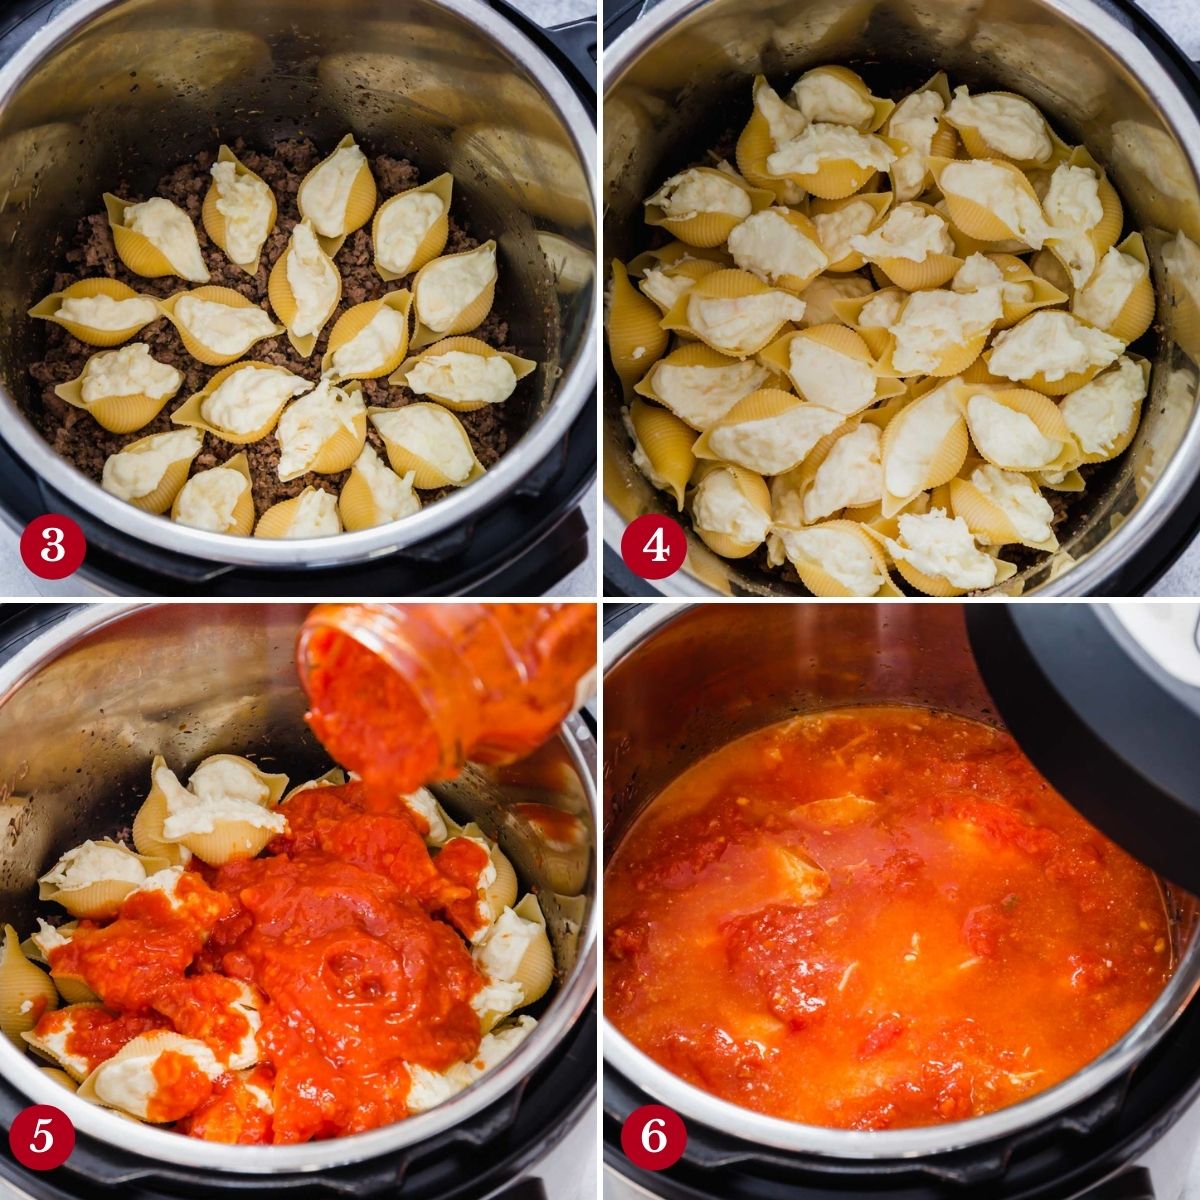
2. Brown meat and assemble
- Cook the ground beef on the sauté mode in your Instant Pot. If there is any excess water, drain and smooth the ground beef at the bottom of your Instant Pot. Add the first layer of filled pasta shells on top of the ground beef.
- Then, add all the remaining pasta shells in layers on top of that foundation layer.
- Add water and pasta sauce. DON’T be tempted to stir it!
- Secure the lid and set the Instant Pot to Pressure Cook/Manual for 8 minutes on high. Once cooked, quick release the Instant Pot by turning the valve to venting. And carefully open the lid.
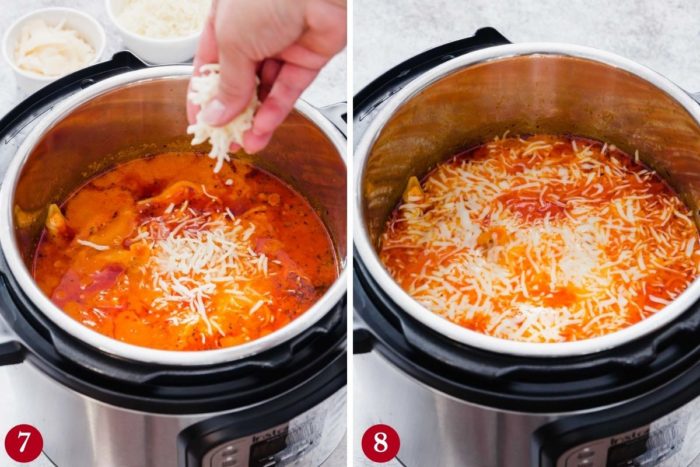
3. Add cheese and serve
- Sprinkle remaining mozzarella cheese and close the lid. Let it sit so the cheese can melt for about 3 minutes.
- Final step: Open the lid and give it a good stir before serving! All the meat is on the bottom, so you want to gently stir from top to bottom and back to top. 🙂 Enjoy!
What do you eat with stuffed shells with meat sauce?
A nice bread like garlic bread or crusty French baguette or a simple salad.
Jumbo Pasta Shells Time-Saving Tips
- Multi-task! Start with browning the ground beef. And while the meat is cooking, which will take about 10 minutes, work on ricotta filling and pasta. But make sure to quickly stir meat a few times.
- No need to par-cook the pasta shells, which not only saves you time, but also one less pot to clean!
- Use a piping bag (or a ziplock bag with one corner cut) to fill the pasta shells with ricotta filling. It’s so much faster than spooning the filling into each shell.
Storing Stuffed Shells with Meat
- Store in the fridge for up to 3 days.
- You can freeze this recipe for up to 3 months.
How do you reheat frozen stuffed pasta shells?
Place the shells in an oven proof dish in the oven covered with aluminum foil. Bake at 450°F. Once they start sizzling, they are ready. You can also microwave them by adding extra sauce or a bit of water and cook them at medium heat for 1 to 1 ½ minutes.
Large Stuffed Shells Instant Pot FAQ
Yes, there should be a slight graininess to the texture.
Jumbo pasta shells are also called conchiglioni pasta.
It’s totally normal for the stuffed shell to be watery as soon as you open the lid. Simply set the Instant Pot to “saute” mode and let it cook for a few minutes, stirring. It’ll thicken up in just a few minutes.
Not quite. Manicotti are tube-shaped pasta, and stuffed shells are made with large shell pasta. Both manicotti and stuffed shells can be filled with ricotta and meat mixture and topped with pasta sauce.
Some people use cottage cheese for stuffed shells instead of ricotta cheese.
There are about 35 jumbo shells in a 12oz box.
More Pasta Recipes
If you love pasta dishes as much as we do, check out our delicious pasta recipes!
Stuffed Shells (Instant Pot)
Ingredients
- 1 lb lean ground beef
- 1 teaspoon salt
- 1 teaspoon garlic powder
- 1 tablespoon Italian seasoning
- 15 oz ricotta cheese
- 1 egg
- 4 cups mozzarella cheese shredded, divided (about 1lb)
- 1/2 cup parmesan cheese
- 8 oz jumbo pasta shells (conchiglioni pasta)
- 2 cups water
- 24 oz pasta sauce
Instructions
- To brown the meat: set the Instant Pot to Sauté.
- When the display reads “HOT”, add ground beef, salt and seasonings and brown the meat, breaking it apart, about 10 minutes. Stir occasionally.
- To make the cheese filling: while meat is browning, in a medium bowl, combine ricotta cheese, egg, parmesan cheese and 3 cups of mozzarella cheese. Mix well and transfer the mixture in a piping bag with a round tip (or a ziplock bag with one corner cut).
- Fill the pasta shells with the cheese mixture.
- Once the meat is browned, drain, if needed, and spread it evenly in the bottom of the pan. (Note: deglaze the pan with 1/4 cup of water if there is any bits and pieces are stuck to the pan.)
- To assemble: layer the filled pasta shells over the meat.
- Pour water and then pasta sauce over the pasta. Do NOT stir.
- Close the lid and make sure the valve is set to “sealing”.
- Set the Instant Pot to Pressure Cook/Manual for 8 minutes on high. (NOTE: It took 20-24 minutes for my IP to come to pressure.)
- Do quick release by carefully turning the valve to venting. And carefully open the lid.
- Sprinkle remaining 1 cup of mozzarella cheese and close the lid. Let it sit for about 3 minutes and then open the lid. Stir gently and serve.
Video
Notes
- Store in the fridge for up to 3 days.
- You can freeze this recipe for up to 3 months.
Nutrition
* Disclaimer: All nutrition information are estimates only. Read full nutrition disclosure.

Sharing of this recipe is encouraged and appreciated. Copying of full recipe to any social media is prohibited.
Stay connected and join Busy Cooks community:
FACEBOOK | PINTEREST | INSTAGRAM

Reader's Reviews
Megan says
This is so yummy! I made this with manicotti & the whole family enjoyed it. Next time, I will let it sit or saute without the lid at the end, since there was some excess liquid. Leftovers reheat very well, too!
Shinee says
That’s awesome, Megan. So glad you and your family loved it. Thank you SO much for your feedback!
Michelle Kane says
I’ve made this recipe a couple of times and the family love it! Wonder if they can be made with manicotti shells and that’s all that was at the grocery store today 🤷🏻♀️
Shinee says
Hi, Michelle. Thank you for your feedback. So glad you tried and loved the recipe. Yes, you can use manicotti shells, but just make sure they’re set over meat. I may increase the cook time by 2-3 minutes just in case. Let us know how it works out, if you try it.
Angie says
I made this last night and everybody from my five-year-old grandson to my gave it a thumbs up.. I made it just as written. Next time, I may add Italian sausage and a different sauce, as I just used roasted garlic and basil this time. I may try it with a vodka sauce next time. In fact, my grandson requested leftovers for lunch today.
Shinee says
Angie, so happy you and your family loved this recipe!!! Thank you so much for your feedback. Vodka sauce sounds like a great idea. Next time, I’ll try that as well!!
Chrys says
Love this recipe, quick and easy!!
Shinee says
Fantastic. So happy you love it. Thanks, Chrys!
Amanda says
I’m new to the instapot crew. Do I cook the shells prior to putting them in the instapot?
Shinee says
Hi, Amanda. No, no need to cook the pasta shells. Fill them and put them in Instant Pot raw. You can watch the full video here: https://youtu.be/YRXWapEZVjo
Karen W. says
Got the burn message…moved it to the oven to bake and was delicious! I did deglaze the pot…don’t know what else to do. It was clearly the meat that burned….want to make it again, but what else can be done to prevent the burn message
Shinee says
Hi, Karen. Thank you for your feedback. The main culprit for “BURN” notice is usually something stuck to the bottom of the pan. So it’s important to deglaze the pot well and to make sure there was no browning whatsoever. Another thing is try not to let the pasta sauce reach the bottom of the pan, that’s why it’s important to pour the sauce last and not to stir it. Hope this helps, and you’ll try it again. Keep me posted, Karen.
Addy says
I made this a month or two ago for the first time and it is one of my FAVORITE instant pot recipes!!!! My boyfriend and I love it and were able to eat on it for a couple of days. I highly recommend this recipe!! Thanks for sharing!!!
Shinee says
Yay, so happy you loved this recipe, Addy. Thank you for review!
Rebekah says
I’ve made this recipe at least 5 times and my husband and I absolutely love it! I usually have enough of the cheese mixture to fill almost all the shells in the 16 oz box I bought. The last time I made it, I had three unfilled shells left over and I dropped one (whoops!). I throw all the shells I fill in the instant pot, and cook it using the same measurements/ingredients, and it comes out great! We end up eating it for a few meals during the week and don’t get sick of it!
Shinee says
Hi, Rebekah. I’m so happy you and your husband enjoy this meal as much as we do! It’s a regular in our family too! Last week, I made it again and filmed a quick video as well. Can’t wait to share it. Thank you SO much for your feedback!
Regan says
This was sooo good! The only difference I made was omitting the Italian Seasoning (only because I didn’t have it in my panty), so instead I substituted ground pepper and a little extra salt. I was afraid it still had a little too much liquid even after cooking and stirring, let set for a little longer just on the “Keep Warm” feature, and the extra liquid seemed to have simmered out before putting the rest in containers. I’m glad it makes enough to store in the freezer if can’t be eaten all at once, especially if you are only eating for one! Will be recommending this recipe to my friends and coworkers!
Hannah Lester says
Is the egg necessary for the filling. I’m allergic to eggs.
Shinee says
Hi, Hannah. I’ve made the filling without an egg, and it works just fine. You’ll need to add a little bit of water to thin out the filling. About 1/4 cup of water should be good. Let me know how you like it, if you make it.
Becky says
This was the very 1st recipe I have done in my brand new insta pot and I absolutely loved it! As a new user I loved that you included how much time it took to brown the chuck and the time it took for your pot to pressurize. I followed the recipe to a tee and it was fabulous! This is also the 1st time that I am taking the time to comment on a recipe that I have used on pinterest. I really loved it, thank you!
Shinee says
Yay, welcome to Instant Pot fan club, Becky! 🙂 I’m so glad you loved your first Instant Pot meal and that my recipe directions were helpful! I really appreciate your feedback!
Stacie says
Made this tonight. It was very good. I have a Ninja Foodi so the only thing I did different was when it was done I air fried the cheese on top for 5 minutes. It was heavenly.
Shinee says
Yay, so glad you loved it. Thank you for your feedback.
Cheri says
Very good, next I’ll cook it for 9 min. Shells a little to firm. I used ground turkey.
Shinee says
Thank you for your feedback, Cheri!! So happy you loved it.
Jedonia Cooper says
Thank you for this recipe. I’m late to the Instant Pot party but I am so glad I have arrived. I changed the recipe slightly. I added spinach to the stuffing (that’s the way my family normally eats them), used Italian sausage, and Alfredo sauce. It turned out perfect and way faster than the oven. My family was thrilled and it tasted delicious! Thank you again for sharing.
Shinee says
Hi, Jedonia! I’m so happy to read that you and your family loved this recipe. I love the spinach addition too! Thank you for sharing your feedback and your modifications.
Grace says
My husband raves about this recipe to literally everyone– even claiming it’s better than his mom’s lasagna!! It has become a family favorite of ours, one we keep coming back to!! Thank you so much for such a delicious and easy and yummy dinner recipe! 🙂
Shinee says
Wow, this is quite the compliment, Grace. Thank you so much for sharing.
Tiffany says
This recipe is absolutely amazing! I usually do not comment on recipes, but considering I have made this one at least 10 times now, I figured I should. Every time I make this it comes out perfect! My kids and husband all love it! I have an 8 quart IP and follow the directions exactly and never have a problem. Thank you so much for this wonderful recipe that has now become a staple in our home!
Shinee says
That’s amazing, Tiffany!! So happy to hear that it has become your family’s staple!!! Thank you so much for your feedback!!!
Christine Nappi says
I got a burn massage
Shinee says
Bummer! It’s really important to deglaze the pot really well after browning the meat.
Lisa says
This is so good! The only thing I need to tweak is the amount of liquid. I let it set for 5 min and it’s still a tad watery. But that ridn’t Stop my Hubble from getting seconds! LOL This one goes in the weeknight rotation. P.S. I broiled it a bit….just for good measure.
Shinee says
Hi, Lisa. So glad you and your family enjoyed this meal. I’m surprised you had too much liquid. Mine usually gets absorbed after stirring. Thank you for sharing your feedback!!
Caitlin says
The first thing I ever made in my Instant Pot and it turned out excellent! The instructions were so clear and easy to follow, and the shells were delicious. The only change I made was cooking them 10 minutes instead of 8 because my boyfriend likes pasta a little more done and they were perfect. Will definitely be making again!
Shinee says
Welcome to Instant Pot world!!! So happy your first meal in IP was a success. And thank you for your feedback, Caitlin!
Angela Venable says
YUMM-O-LA!!!!! All I can say is that I will be making this one again! I followed the directions with just a few tweaks. I used half ground beef and half Italian sausage.
I bought a 15oz. container of shells and threw all but ten in. My shells were perfectly al dente, the sauce rich and creamy. FYI, you will loose 80% of your shell stuffing….but that’s also what helps the sauce be so rich and creamy. When you do bite into a shell that kept its yummy stuffing your eyes will roll up in yo head! Topped with fresh basil I searched this with with garlic bread and a simple Caesar salad. 😁
Shinee says
Yay, so glad you tried and loved the recipe. And thank you for your feedback and sharing your tweaks, Angela!
Shawn says
I’m a vegetarian so I didn’t use any meat so I didn’t think I would need to deglaze anything. I followed the recipe otherwise to the letter. Unfortunately I got the dreaded FOOD BURN message like the others. What can I do next time?
Shinee says
Hi, Shawn. Thank you for your feedback. It sounds like you put the shells directly in the pot? If so, the pasta tends to stick to the pot, which causes the burn notice. I’d suggest sautéing some vegetables and layer the pasta over them, like my vegetarian spaghetti.
Holly Douglas says
I made this recipe with the exact same cooking instructions but added more seasonings to the cheese and used 2 lbs of meat. It turned out perfect!!! The only thing I didn’t like was by stirring it up some of the shells lost their filling but it still tastes great.
Shinee says
Hi, Holly! Happy you tried and liked the recipe! I appreciate your feedback and notes. Thank you for sharing!
Rebecca Corbitt-Daugharty says
I followed the recipe exactly as written. It was wonderful. Very tasty. The finished product was a little soupy for my taste but definitely edible. I can’t wait to take the leftovers for lunch tomorrow.
Shinee says
So glad you enjoyed the recipe, Rebecca. Thank you for your feedback!
Nicole says
Followed recipe exactly as written but in an 8 qt IP and everything turned out perfect. Excellent recipe for a fast weeknight meal. Roasted broccoli while IP came to pressure and cooked and the timing was perfect.
Shinee says
Fantastic, so happy you tried the recipe, Nicole. And thank you for your feedback!
Dora A. Lilly says
We loved this recipe. Added 2 minutes to cooking time, total 10 minutes with 5 minute natural release which was perfect.
Shinee says
So glad to hear you loved it, Dora! Thank you for sharing your feedback and notes.